This quick start guide will assist new players from downloading Phantasy Star Online 2 Vita through logging in. The guide will expand later on to cover other topics.
Welcome to the Phantasy Star Online 2 Vita: Quick Start Guide!
Please check that your Vita can connect to the official website prior to installing this game. If not, you will need a VPN in order to connect to the servers.
PSO2 Vita Fact Sheet
- Phantasy Star Online 2 is a free to play game that can only be played online!
- It is recommended you purchase an 32GB or higher memory card to store additional updates.
- You can play the game over 3G and WiFi, however, WiFi is required when downloading updates.
- The game is supported by Arks Cash where you pay real money to acquire items and such.
- You can purchase Arks Cash at the Sega ID Management Page.
- You can not purchase Arks Cash through the PlayStation Store.
- You can optionally purchase the PSO2 Episode 3 Deluxe Edition which comes with several in-game items.
Please remember that maintenance is every Wednesday from 11:00 through 17:00 JST. Use the PSO2 Calendar to automatically convert this into your time zone.
Before you start, if you do not plan on purchasing the Vita Special Package version, you will be required to create a Japanese PlayStation Network Account. You can search Google for several tutorials on how to create one.
When you arrive at the PlayStation Store, click the magnifying glass at the top right corner and enter "PSO2". When you reach the main page, click the orange button (like in the screenshot above) to download the game.
After the game has downloaded, you can click on its icon to reach the "Live Area" screen. As shown in the screenshot above, you can start the game by touching the center "Phantasy Star Online 2 はじめる" icon. The left icon sends you to the Vita website, while the right icon sends you to the SEGA ID registration page. (This screenshot may not reflect what's currently on your screen.)
If there is a patch, you can press the orange orb at the top left corner of the screen to download the update.
After pressing start on the Title Screen, you will reach the Title Menu.
オンラインログイン (Online Login) Choose a Ship (Server) to play on.
ユーザー情報変更 (Edit User Info) Opens SEGA ID Mngmnt. Page
キャラクターポートレート (Character Portrait) Augmented Reality Feature
オフラインキャラメイク (Offline Character Creation)
クレジット (Credits) View Credits
オンラインマニュアル (Online Manual)
タイトルに戻る (Return to Title Screen.)
Select a Ship
Currently the English Community plays on Ship 02. Keep in mind that it costs ARKS Cash to transfer your character onto another ship. After this, you will proceed to the Login screen. Type in your SEGA ID and Password to link your SEGA account with the SEN/PSN account.
If you do not have a SEGA ID you must register one at this page. (If you need help you can use the Registration Guide or Chrome Extension.)
The first time you log in, you must enter your SEGA ID and Password which will link your PlayStation Network Account to your SEGA ID. Once you've linked accounts, you can not switch to another SEGA ID.
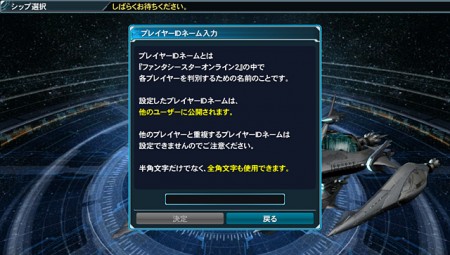
Player ID Screen
Your Player ID is like a screen name that identifies your account within the game. Type in a Player ID to proceed. Do not type your password here because other players will be able to see it within the game. You can not change your Player ID once it’s set.
Start Menu
If you're a new player, you can select the first option to choose a character.
キャラクター選択 Choose a Character (or Create a Character)
サポートメニュー Support Menu
- Options
- Change User Details
- Check SEGA ID
- Online Manual
お友達招待システム Friend Invitation System
タイトルに戻る Return to Title Screen
Character Selection Screen
If this is your first time signing on, you can create a new character here.
キャラクターの新規作成 Create a Character.
After you have successfully created your first character, you will have to pay ARKS Cash each time you wish to create a new character. You may delete your first character and recreate them for free, but every subsequent character you make on your account will cost Arks Cash.
- Your first character is free.
- Your second character and onwards costs ARKS Cash
If you are creating a new character for the first time, you will proceed to the Friend Invitation System. You can skip that menu by pressing the right blue button.
Character Selection Screen
If you created your character and restart the game to the title screen, your Character Selection Screen will look similar to the screenshot above. You may select your character and choose the first option to start the game.
ゲーム開始 Start Game
各種手続き > キャラクターの削除 Delete Character.
In the bottom option, you may choose to delete your character. Keep in mind that you can delete and recreate your first character for free. However, upon creating your second character, you will have to pay ARKS Cash if you wish to recreate them after deleting them.
Character Creation
You should be able to navigate through Character Creation without needing to understand Japanese. Just select from the list of sex and race combinations, choose your class, and select a preset, then create your character.
Character Name
Once you've created your character, you can type in their name. You will then proceed to a confirmation screen which will transfer you to the main game.
Battle Interface
While you are in a quest, the interface is set up as follows:
- (1) Radar Map
- (2) Your Character
- (3) Your HP
- (4) Your Sub Palette (Healing Items/ Skills / Photon Blast)
- (5) Your Weapon Palette
- (6) The Chat Icon. (Single Tap for Shortcuts and Double Tap to chat with other players)


